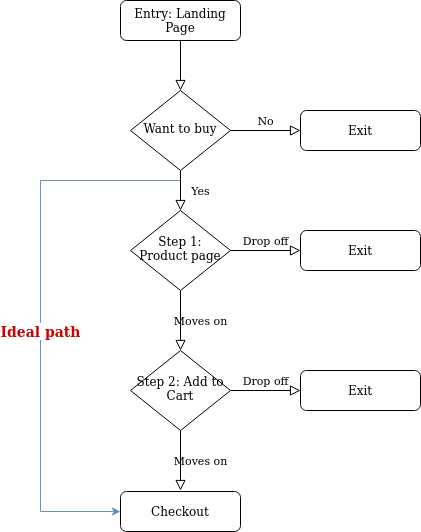
When it comes to digital sales funnel, unlike its traditional counterparts and what another blabber all over the internet – data tells us that longer the sales funnel more chances of customer that is being dropped off.
With content-based marketing or even complex sales funnel where your blogs or emails are your sales drivers. There is an absolute need for you to give a chance to your client to shorten the sales process.

There are a lot of WordPress themes that are devoted to Sales Funnel but don’t have support for WooCommerce (likes of Thrive themes). In this case, most of the clients will create a subdomain and have their sales process there.
Or if you are writing a blog (on your website or outside) trying to sell an eBook, you want people to reduce the number to checkout.
The aim of this tutorial is to help you to reduce the number of steps to checkout.
Traditional Process: When I mean traditional sales funnel there is no focus or thought given to how the checkout process will happen. The effort is to get people to your website or landing page. When you see the diagram above longer the sales process there are more chances for the clients to drop off.
How Can I reduce my Sales Process?
If you are doing content-based sales from within your WooCommerce + WordPress site, WooCommerce provides you with a shortcode [add-tocart].
But, when your blog is on a different website or you want a checkout directly from your landing page. This is how it is done:
Finding the product ID
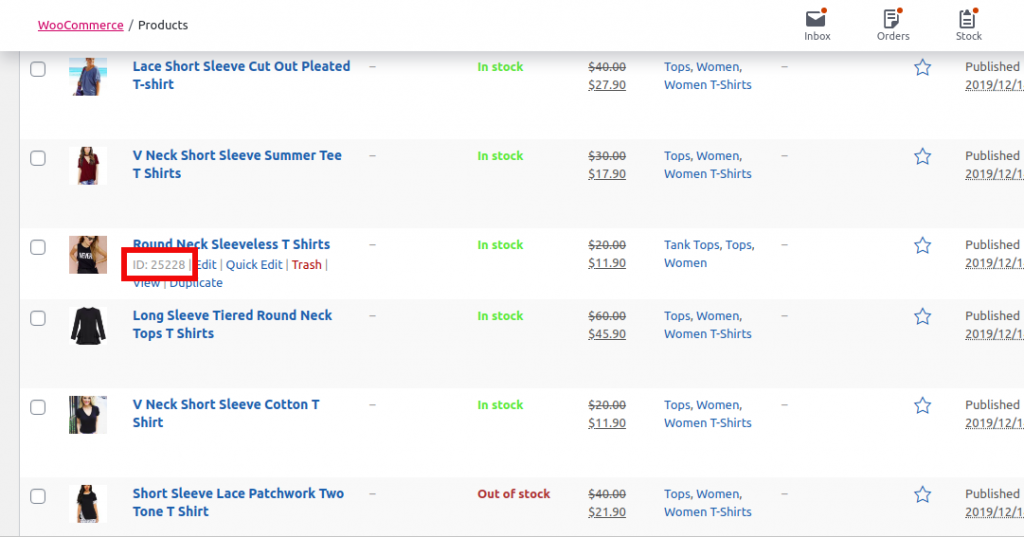
You will need a product ID before you can start to create an add to cart URL. To find the product ID first goto all product products.

Hover your mouse over the product, it will display the product ID, as shown in the image below.

Creating a Custom Add to Cart URL: Simple Products
Product ID: 25228 – all you need to do is add /checkout/?add-to-cart=25228 to your shop URL.
https://yourshopdomain.com/checkout/?add-to-cart=25228This URL will take your customers directly to the checkout page.
Creating a Custom Add to Cart URL: Variable Product
The main advantage of WooCommerce it gives you full flexibility. So you can also add variable products. Three-part of the URL:
- Product ID
- Variation ID
- Attributes
For instance you are selling a T-Shirt with variation of Color Black and Size Large.
Step 1 (Getting Product ID): The steps to get your product ID is exactly the same as mentioned above.
Step 2 (Getting the attributes): Go to the product. Add to cart. Simply right-click on the main product and select Copy Link Location or Copy Link Address.
Copy the link into your a notepad or any text editor. What section you are looking for is the attributes, which need to be extracted from the URL.
Whole URL: https://streetfashionoverload.com/product/v-neck-short-sleeve-summer-tee-t-shirts/?attribute_pa_color=black&attribute_pa_size=l
Attribute section: attribute_pa_color=black&attribute_pa_size=l
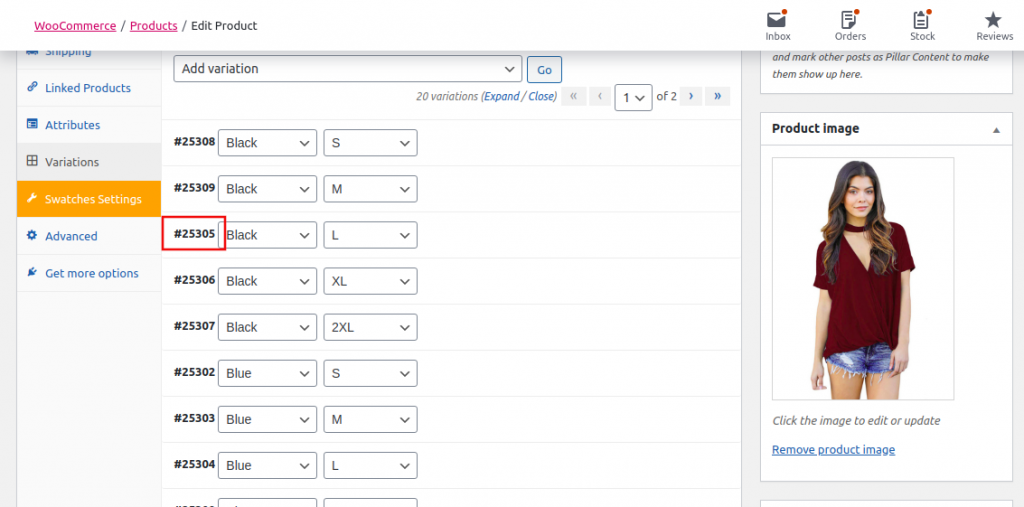
Step 3 (Get the Variation ID): In your product Editor, move down to product data. Find the variation for Color Black and Size L.

In the case of this example, the variation ID is 25305.
Step 4 (Build your URL): In this step, we will combine all the parts of that product to build the URL.
Product ID: 25228
Variation ID: 25305
Attributes: attribute_pa_color=black&attribute_pa_size=l
URL: https://yourshopdomain.com/checkout/?add-to-cart=25228&&variation_id=25305&attribute_pa_color=black&attribute_pa_size=l
That’s all. This is all your need to create your custom URL. This URL can be used within your anywhere (on your site or outside).
Conclusion
Doing this will help you with faster conversion and reducing the leaks in your sales funnel. Using WooCommerce is extremely easy. From here you can start experimenting with deep URL or pretty URLs.
But, if you still need help with custom URL, you can always request for WordPress Support with us and we will do it for you.
Related Services:

